
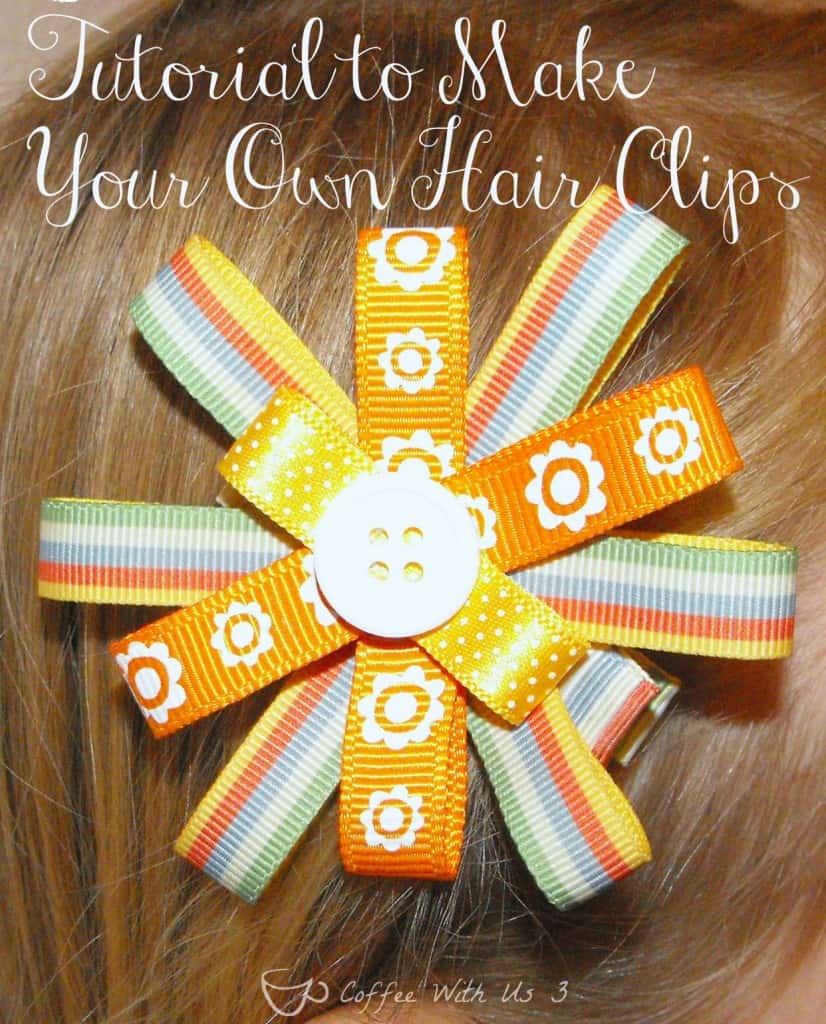
DIY Everyday Hair Clips
Hair clips are so easy and fun to make. I love making my own, because I can make one that perfectly matches an outfit. Today I'm sharing a tutorial on how to make your own everyday hair clips.
Here's what you'll need to make an everyday hair clip:

- Ribbon
- Scissors
- Hot glue gun
- Hair Clips

- Buttons
I picked up the Hair Clips![]() on Amazon. The ribbon was from the dollar bins at Joann's (they usually have mini glue guns there too- for $1), and the buttons were from my button jar.
on Amazon. The ribbon was from the dollar bins at Joann's (they usually have mini glue guns there too- for $1), and the buttons were from my button jar.
To Cover a Hair Clip:

- You will be using the ribbon that measured 5 ¾" to cover a hair clip. Put some hot glue on the first inch or so of the ribbon (approximately- you may need to add a little extra glue). Then open the hair clip and push the ribbon against the top (curved) edge on the inside.
- Put hot glue on the next inch of ribbon and pull tight against the outside top of the hair clip. Push down on the ribbon to get the edges to sort of seal together.
- Put a drop of hot glue on the top inside of the lever area of the hair clip and push the ribbon against it.
- Do the same for the bottom side.
- Put hot glue on the rest of the ribbon and push the ribbon down onto the back of the hair clip. I like to leave the end of the hair clip uncovered so it's easier to get the hair clip into a child's hair.
- Add whatever garnish you'd like to the front- see the following directions to make your own decoration.
Directions:
 Make each piece of ribbon into a circle by hot gluing the end together.
- Make each circle of ribbon into an "8" shape (see picture) by putting a small dot of hot glue on the inside and pushing the two sides together.
- You should have 6 ribbons that look somewhat like an 8 shape.
- Put one of the longest pieces perpendicular to the covered hair clip.
- Using the other 2 longest pieces, make an "X" shape.
- Make another "X" shape with the next smallest 2 pieces of ribbon and put them in the gaps of the other ribbon.
- Glue the smallest piece of ribbon parallel to the covered hair clip.
- Glue the button in the middle (make sure not to put too much hot glue on the back of the button, or it will come up through the holes).
 Make each piece of ribbon into a circle by hot gluing the end together.
Put the hair clip on a headband or just clip it straight into the hair.

You can also follow the directions to cover hair clips and then decorate them with something else, such as these leather flowers from Pick Your Plum. I just hot glued the covered hair clip on the back.


Don't you just love how adorable a sleeping baby is? I sure wish I could sleep like that- especially with the noise and chaos of a brother and sister running around. It doesn't faze her a bit!
 Follow us on Pinterest at Coffee With Us 3
Check out our Link Parties!
Linking up at Tuesdays at Our Home and
Wow so cute! great tutorial 🙂
Thanks! Once I started trying to write down how to do it, it seemed like taking pictures of the step-by-step process would make it so much easier to understand!
SO CUTE! I pinned to try later 🙂
Thanks so much for pinning- we appreciate it!
Oh my, those are adorable! And they look simple to make. I'll be pinning this, and praying for my daughter's hair to grow to I can make these for her! Thanks for sharing, visiting fro D.B.B.
Thanks Victoria! You can definitely make these and clip them to a headband in the meantime until your daughter's hair grows out. Thanks for stopping by!