
DIY Cheap Advent Calendar

When I was little, I remember we did an advent calendar leading up to Christmas. I grew up in a Lutheran church, and advent was a very important season. I always really enjoyed doing the advent calendar, especially because I got a piece of candy every night! What can I say, I love sweets!
Now that Miss Magoo is nearly 4- not even a week until her birthday!- I thought it would be fun to start this tradition at our house. I looked into buying an advent calendar, like the ones that are wooden and have drawers that you can refill each year, but they're really expensive. Maybe I'll save up and buy one next year, but at the time I needed to be buying one if I wanted to get it in time, they were talking about a possible furlough at my husband's work due to the government shutdown, so I decided an advent calendar wasn't exactly a necessity.
So I thought a lot, and looked at a lot of ideas on Pinterest and finally came up with my own idea to make an advent calendar out of toilet paper rolls and tissue paper. Can't get much cheaper than that, right?
Supplies:
- 13 toilet paper rolls
- Craft paint: green and brown
- Tissue paper: green (and brown if you can find it- I had to use a paper sack instead)
- Elmer's glue
- Hot glue gun
- Scissors
- Paint brushes
- Empty cereal box or a piece of cardboard
- Either number stickers or a Sharpie marker
1. First you'll want to get any toilet paper residue off the rolls. Then cut the toilet paper rolls in half. I measured the first one, and once it was cut in half, I used it to measure the rest of the rolls.
 2. Paint the toilet paper rolls. To make a Christmas tree, you'll want to paint 4 of the halves brown and 21 green. You'll have one left over that can just go in the garbage.
3. Trace a circle on the tissue paper around one of the toilet paper rolls, and then trace another circle about double the size. Cut out the circle (I folded the tissue paper up so I could cut many of these at a time). Then cut slits around the tissue paper from the outside into the inner circle, so that the tissue paper can be folded up.

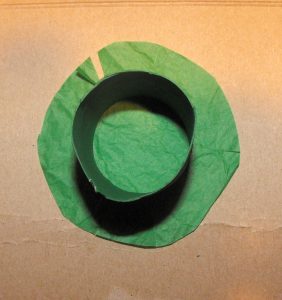 4. Glue around the base of the toilet paper roll with the Elmer's glue, and also in a circle around the edge of the tissue paper. Fold up one of the tissue paper sections, then another. You will probably end up with glue all over your fingers- at least, I did.
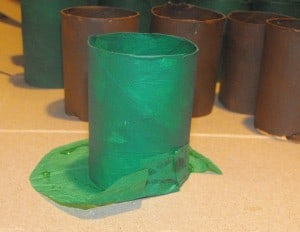 5. Hot glue the toilet paper rolls together into the shape of a Christmas tree. Then fill them with whatever you want to. I put 2 candies in each one, one for Miss Magoo and one for Little Man. Leftover Halloween candy came in handy. Some of the days have extras in them. There's one where I put some mini crayons in it, to go with new coloring books I got the kids.
 There are also 10 days that are randomly picked to have Bible passages in them to tell the kids the story of Christmas. If you're interested in doing this, these are the verses I did. You can definitely do whatever verses you would like, but this is the way I divided it up to keep the passages short enough to keep my little ones' attention while also covering each different part of the Christmas story.
 6. Now that the advent calendar is filled, you will want to hot glue it to the empty cereal box or other piece of cardboard. Place some hot glue randomly around on the ends of the toilet paper rolls. The problem with hot glue is that you need to work fast, so there's no way you can get all the ends. Try to get several, then press the cardboard against the toilet paper rolls for a few seconds. With one hand, grab around several toilet paper rolls, while your other hand steadies the cardboard and flip the whole thing over.
7. Now go around the edges of the toilet paper rolls with hot glue.
8. If you have number stickers, that would probably be the easiest option, but you'll need a lot of the number 1. I didn't realize that I didn't have enough, so I ended up writing the numbers on with a Sharpie marker. Using a marker is completely doable, but make sure not to press very hard, or you'll poke through the tissue paper.
9. Finally, cut out a yellow construction paper star and glue it to the top of your advent calendar tree, and you're ready to teach your kids about advent and help build anticipation of the coming of Jesus' birth.
10. On each day, allow one of your kids to poke their finger through the tissue paper and find what exciting prize awaits them! We will be starting this November 30th, so that the final circle will be done on Christmas Eve.
 Have you ever used an advent calendar? What were your favorite aspects of it, and what were your least favorite? I'd love some input so that next year it can be even more exciting!
 Follow us on Pinterest at Coffee With Us 3
Check out our Link Parties.
Featured at:
The Mommy Club at The Taylor House


Don't forget to pin!

One of the best Advent Calendars I've ever seen--and easy! The only thing I would do different is write (or print) the numbers on printer paper , cut out and glue on. Thank you for such a great idea!
Cher, thanks for the idea! I had planned to use stickers, but realized that I didn't have nearly enough "1"s to make it work. But what a great idea for next time!
Love this idea and would like to feature it on my Share It Saturday round up.
I would be honored if you featured it! Thanks!
Great idea!! 🙂 Now if I could just remember to save those toilet paper rolls!
Once you get started saving them, you might find it hard to stop! I have another toilet paper roll craft I'll be sharing after the new year that takes quite a few, so get started collecting now 🙂
Thanks for the invite, Katie! We linked up!
I've been holding onto toilet paper rolls, too, so you're definitely not the only one! They are so great to use for kids' crafts, plus I have a big project in mind for them as soon as I have some time! Thanks for inviting me to the blog hop!
This is a sweet idea. Growing up, we had one that was cloth and had pockets for little treats. My mom finally found one for my sister and I- really looking forward to doing it with my 19 month old son this year! Thanks for sharing at the Foodies and Crafties Soiree!
Oh, cloth pockets is a great idea! Maybe next year when I have more time I'll work on one that's more permanent, like that. Sounds fun!
Hey Jamie! It's Deonna from the Child at Heart blog! Thank you so much for linking up at the
Merriest Blog Hop! I can't wait to see
all of your holiday ideas...This is such a great, thrifty idea. I loved your post because I call my son "Mr. Magoo" all the time. I am so excited for when he gets older and actually knows how great candy is! haha Love the verses too...great choices 🙂
That's so funny that you call your son that! I'm not exactly sure where the nickname came from, but I think that maybe my mom called me Miss Magoo when I was little? I'll have to ask her.
I look forward to more great ideas!
What a cute idea! Thanks for sharing it with Thrive @ Home Thursday. 🙂
Thanks, Jenni! And thanks for hosting the party!
I have been looking for an advent calendar to do with my son. I can't wait to make this this weekend. Thank you for sharing your idea
You're welcome, Sandy! Have fun making it!
This is just what I was thinking of doing for my preschool class. I teach 2 year olds, this would be perfect. I am going to put rolls of Smarties candy in for each day. They'll love it. Thanks for taking all the planning work out of it.
Jenn, I'm so glad this will work for you! And I bet the 2 year olds will love poking their finger through the tissue paper. I can't wait to see what my kids think of it!
What a cute idea! And I love that it's cheap too... just my kind of project 😉
Pinned! Shauna @ The Best Blog Recipes
Cheap projects are the best- that way if they don't turn out perfect at least I'm not out a bunch of money. Thanks for stopping by, Shauna!
Thanks for posting this at Talking Tuesday - Over the Fence... pinned it also.
Thank you for pinning, Mary Ellen!
Great idea! I grew up with an Advent calendar! Love it! Pinned! Linda
Aren't they fun? I still remember how exciting it was to open the next day!
I always would by my nieces and nephews Advent Calenders but as they are now so far away it isn't possible. This would be a great advent Calendar to make and I love the idea of putting bible verses in with the treats. I wish I had children to make this for... Sharing on google +
Thanks for sharing, Marlys! It sounds like you are probably a favorite aunt!